How to Make Your Own Award Certificates
Throughout the school year, there are plenty of reasons to celebrate with your students! There are lots of printable award certificates out there, but why choose something impersonal when you can make a custom award that your students (and their parents!) will want to keep forever? With this tutorial, you can learn how to design your own award certificates for any and every occasion! This guide will teach you the basics of using PicMonkey.com to design awards for perfect attendance, completion of a learning challenge, or simply to reward your star student of the week. Customize your certificates for holidays or special events, or simply show your spirit by designing certificates with the school's colors. The possibilities are endless!

1. Go to PicMonkey.com, and select Design.

2. Using the tools found in the lefthand column, go into "Basic Edits" and click "Resize." Specify your canvas size to be 1056 X 816 pixels. This will ensure that your certificate will fit on a standard sheet of computer paper (8.5 x 11 inches). Make sure you uncheck "Keep Proportions" so you can correctly enter your dimensions. Click "Apply."


3. Now that your canvas is set to the proper size, you can explore PicMonkey's many options for customization! Start by opening the "Frames" tab. While you can experiment with any frame style you want, beginner PicMonkey users can start by selecting "Simple Edge."


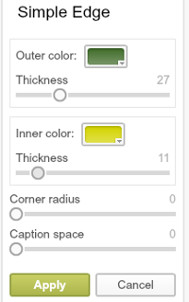
4. Select the outer color for your frame by clicking the colored box and selecting the color of your choice. In the same way, select the color for the inner color, if you choose.You can also leave the inner color white so it blends with your paper. You can also adjust the thickness of each color to create the effect of your choice, and you can use the "Corner radius" slider to create rounded corners. Save your changes by clicking "Apply."

After manipulating the frame, you must return to the "Basic Edits" and make sure your canvas size is still 1056 X 816 pixels. If it is not, simply re-enter those numbers and click "Apply."

5. Now that you have designed the border of your award certificate, it's time to add the text. Open the "Text" tab and choose a font. When you find a font you like, click "Add Text" and begin typing in the field that says "Type your text here."

Use the text tool to manipulate your text. To change the size of your text, you can highlight your text and use the slider in the text tool to manipulate font size, or you can click and drag the corners of your text field to make it bigger or smaller. Once you set the size and color, click and drag your text to put it in the right place. You can also rotate your text, if you so choose.

Repeat these steps to create the rest of the text for your certificate. Make sure you have a place for the student's name, your name, and the date! Mix and match different fonts and colors to get the look you want.

Tip: if your lines look too dark, go into the "Overlays" tab and select the rectangle. Resize it by clicking and dragging the corners.


6. Once you are satisfied with the text and general layout of your award cerfiticate, you can add images and designs to make it special. If you want to include your school's logo or mascot, for example, you can go into the "Overlays" tab and click "Your Own" to use an image saved on your computer. Once the image pops onto your canvas, click and drag it to position your image.

The "Overlays" tab also has several shapes, banners, and clipart options that you can use to customize your award certificates. Browse through the tab to find a design that you like and click on it. Once the image pops up on your canvas, you can change the size and color in the same way that you changed the size and color of your font. Click and drag your overlay to position it.

Overlays can also be layered. To do this, simply select another overlay and position it over an image you have already placed on your canvas. You can also manipulate overlays by right-clicking and selecting "Move to Front" or "Move to Back." In the screenshot below, we simply selected the same overlay as we did in the screenshot above, changed the color, changed the size, and positioned our new overlay right on top of the old one. This is a simple trick to add dimension to your award certificates.

You can also position text over your overlays. To do this, simply go back into the "Text" tab and repeat the actions in step 5.

7. Once you are satisfied with your award certificate design, click "Save" to save your design.

8. Once your design is saved onto your computer, simply print it as a full page photo, and your certificates are complete!

Read NextSafe Cracker Printable Math Game