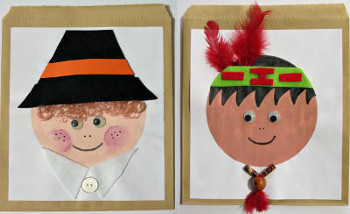
Pilgrim and Indian Thanksgiving Treat Bags
Celebrate the first Thanksgiving by making these adorable Pilgrim and Indian Thanksgiving Treat Bags! Giving guests a special gift to go with their dinner is sure to make any Thanksgiving unforgettable, but since these DIY treat bags can be made by your kids, your family and friends will cherish them even more. Fill these Thanksgiving crafts for kids with candies or other small tokens, and be ready to share the season's bounty with the ones you love.

Materials:
- 2- 8" brown paper bags
- 2 pieces of plain white paper
- 1 small piece of orange paper
- Felt: red, green, black, and white
- 3 small red feathers
- 2 pairs of 10mm googly eyes
- 2 oval wooden beads
- 1 round wooden bead
- Curly blonde synthetic doll’s hair
- 1 15mm flat-sided white button
- Acrylic paint: flesh, brown, and red
- Paintbrush
- Black and maroon felt-tip pens
- Pencil
- Standard scissors
- Quick-drying craft glue
- Plastic lid, approximately 4.6" in diameter
Instructions (Indian Treat Bag):
- Use the plastic lid to draw a circle on the piece of white paper.
- Use the pencil to draw hair, and then color the hair with the black felt-tip pen.

- Mix a teaspoonful of flesh paint with a drop of red and brown paint to obtain a darker hue of flesh colored paint. Use this to paint the face and allow to dry thoroughly.

- If necessary, touch up the hair again with the black felt-tip pen.
- Cut a strip with a width of 1” from the green felt.
- Glue two of the feathers in place on the left of the head, and glue the green felt across the hair, covering the bottom parts of the feathers.

- Cut shapes from the red felt and glue them onto the green felt.
- Glue the wiggle eyes in place.
- Use the black felt-tip pen to add a mouth and nostrils.

- Glue the two oval beads at the bottom of the face.
- Add a drop of glue to the tip of the third feather and thread it through the round bead.
- Cut off any part of the feather that might protrude at the top of the bead and glue the round bead in place to complete the “necklace.”
- Allow to dry on a flat surface for a few minutes.
- Center and glue the white paper with the completed Native American to the front of the brown paper bag.

Instructions (Pilgrim Treat Bag):
- Use the plastic lid to draw a circle on the piece of white paper.
- Use the flesh colored acrylic paint to paint the face and allow to dry thoroughly.
- Glue the doll’s hair in place.

- Trace the hat’s crown and rim onto the black felt and cut it out. Glue it in place over the doll’s hair.

- Cut the hat’s band from the orange paper and glue it in place.
- Glue the wiggle eyes in place.
- Use the felt-tip pens to add facial features.
- Cut two triangles from the white felt and glue these below the face to make the pilgrim’s collar.
- Glue the button in place below the collar.

Read NextThankful Tree