This project was submitted by one of our readers, just like you.
Tissue Art Tutorial
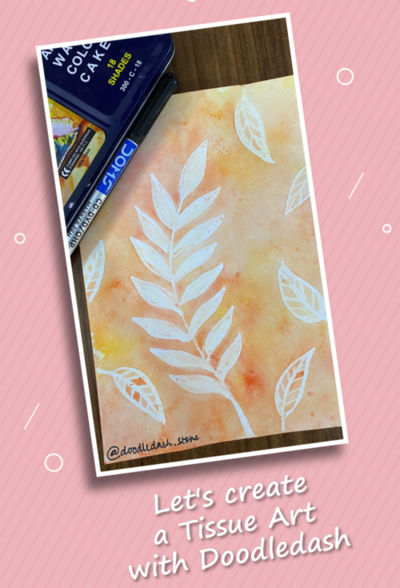
From the designer: "Are you ready to embark on an artistic journey that combines imagination and colour? Create mesmerizing Tissue Art following this comprehensive guide. With Doodledash's products that encourage creativity, you can create stunning Tissue Art. This guide walks you through the step-by-step process of crafting your Tissue Art masterpiece. Discover the magic in the step-by-step video tutorial, and let your artistic adventure commence today. Essential Materials To get started, gather the following materials: • Doodledash white cards • A white wax crayon • Watercolours • Tissue paper. "
Primary TechniquePaper Crafts

Materials List
- Doodledash white cards
- A white wax crayon
- Watercolours
- Tissue paper
Instructions
-
Unleash Your Imagination - The first step in creating your Tissue Art masterpiece is to let your creativity flow. Take the white crayon and draw anything you desire on the white sheet of paper. The first sketch that you make will be the basis for your artwork.
-
Prepare the Tissue - Once you've outlined your design, it's time to prepare the tissue paper. Dip the tissue into the water and gently squeeze out any excess moisture. This damp tissue will be crucial in transferring the colours to your artwork.
-
Infuse Color - Select the colours you wish to incorporate into your Tissue Art. Dip the damp tissue into the watercolours of your choice from the palette. Allow the tissue to absorb the vibrant hues, creating a palette of colours that will bring your artwork to life
-
Apply the Colors - With the colour-laden tissue in hand, gently dab it onto the white sheet of paper. As the damp tissue comes into contact with the paper, the colours will transfer, revealing the intricate design you sketched earlier. This is where the magic truly happens, as your creation begins to take shape.
-
Build up the Layers - Consider double-coating certain areas of your Tissue Art for added depth and visual appeal. Apply a second layer of colour by repeating the dabbing process. This layering technique creates a sense of dimension and complexity in your artwork. Allow the layers to dry naturally, solidifying the stunning visual effect.
-
Refine and Finalize As your Tissue Art dries, take a moment to admire the colourful masterpiece you've crafted. To perfect the final result, dampen a fresh tissue and delicately remove any excess paint from the motifs. This step ensures that the intricate details of your artwork shine through vividly.
-
Unveiling Your Tissue Art And there you have it – through the artistic process of Doodledash's Tissue Art technique, you've transformed a simple white cardr into a captivating masterpiece bursting with colour and creativity. In the video shared, we take you through the same step-by-step instructions enabling you to create your very own gallery-worthy Tissue Art.


