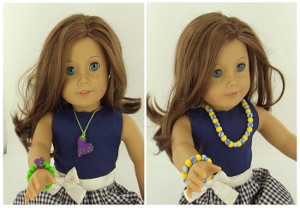
The Cutest Doll Jewelry
Since you're always decked out in the latest trends, it's about time your doll gets the same treatment. DIY jewelry is the best way to decorate your doll's neck and wrist because it's inexpensive and a blast to make. Adorn your favorite friend with The Cutest Doll Jewelry to turn her into a fashionista like you. Once you finish your masterpiece, baking Sculpey clay only takes a short amount of time, which means that your doll will be ready for an afternoon out in no time.

Materials:
- Sculpey® III in the following colors: Blue, Turquoise, Granny Smith and Purple
- Sculpey® Modeling Tool Set
- Toothpick
- Stretch cord and jewelry cord
Instructions:
Notes: Do not use unbaked clay on unprotected furniture or finished surfaces. Start with clean hands and work surface area. Good work surfaces include wax paper, metal baking sheet, or disposable foil. Knead clay until soft and smooth. For best results, clean your hands in between colors. Shape clay, pressing pieces together firmly. Bake on oven-proof glass or metal surface at 275°F (130°C) for 15 minutes per ¼" (6 mm) thickness. For best baking results, use an oven thermometer. DO NOT USE MICROWAVE OVEN. DO NOT EXCEED THE ABOVE TEMPERATURE OR RECOMMENDED BAKING TIME. Wash hands after use. Baking should be completed by an adult.
1.) Begin by preheating oven to 275°F (130 °C). Test temperature with oven thermometer for perfectly cured clay. For best results, condition all clay by squeezing small pieces in your hands until they are soft and pliable.
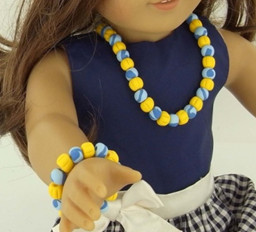
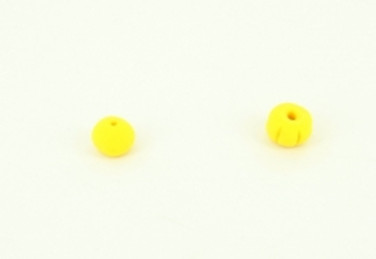
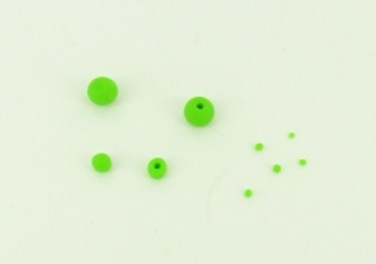
2.) Using the ¼ ounce of Yellow clay roll into a 7 inch log. Cut the log into 28 pieces, which are then shaped into balls. Press a hole through the balls with a toothpick, while still on the toothpick press lines around the bead, using the purple knife tool.
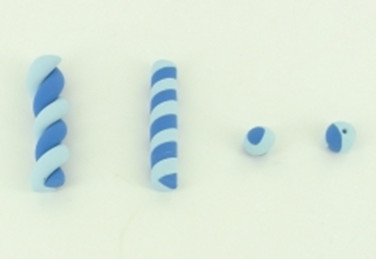
3.) Use ¼ ounce of each Sky Blue and Turquoise and shape each color into a log. Twist the colors together and slightly roll to reshape into a 7 inch log. . Cut into 28 pieces. Shape each piece into a ball and pierce a hole with the toothpick.
4.) Bake all beads as directed above and let cool. Take 21 of each color bead and string into a necklace. Use 7 of each color bead and string into a bracelet. Double knot both the necklace and bracelet.
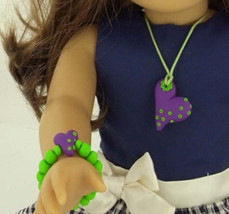
5.) Cut 1/16 ounce of Granny Smith and cut into 8 pieces. Using your palms shape into round beads. Cut one of the beads in half and reform into round beads, these will be used on either side of the heart. Pierce each bead with a hole using the toothpick. Create some very tiny Granny Smith balls.
6.) Using 1/8 ounce of Violet and 1/32 ounce of Violet and shape each into a teardrop. Slightly flatten and with the knife tool and indent the top of each to form a large and small heart. Using the toothpick to press a hole into the upper left side of the larger heart. Slightly stretch the hole to make it large enough for the string to fit through. Use the toothpick to pierce a hole through the smaller heart. Make one small Violet bead for the closure. Decorate the hearts with the tiny Granny Smith balls.
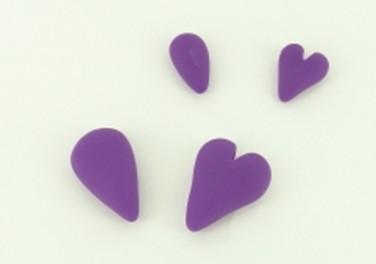
7.) To assemble the bracelet: String the small Granny Smith beads and the small heart onto the stretch magic cord, placing the two smaller beads next to the heart. Make a double knot. To assemble the necklace: Cut a 10 ½" piece cord, tie one end to the small Violet bead, on the other end make a loop to fit the bead through, then loop through the heart.
Read NextFlying Paper Plate Frisbee