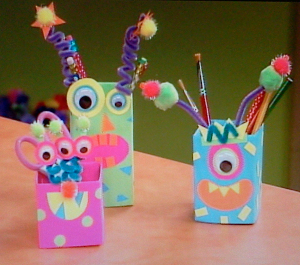
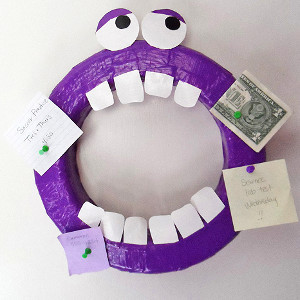
Monster Milk Cartons Desk Set
When kids have an inspiring work space, doing homework is so much more fun. This Monster Milk Cartons Desk Set will scare away their homework hesitation and inspire them to unleash their creativity as they work. DIY desk organizers like this one are incredibly budget-friendly, since you can grab your supplies from the recycle bin. Plus, kids will have a blast making these milk carton crafts as crazy and colorful as they possibly can. Organizing ideas have never been so fun and funky!

Materials:
- Craft Bond® Tacky Glue
- Craft Bond® All Purpose Glue Stick
- Fuzzy Sticks – Neon (Horizon Group USA)
- Shimmer Poms – Neon (Horizon Group USA)
- Neon Poms (Horizon Group USA)
- Wiggle Eyes – Assorted Sizes (Horizon Group USA)
- Cardstock paper – neon colors
- Milk cartons – individual sizes
- Double sided tape
- Clothespins
- Scissors
- Pencil
- Ruler
Instructions:
1. Thoroughly wash and dry milk cartons. Use scissors to cut top from carton.
2. Lay a piece of cardstock on work surface. Lay side of carton on long side of paper lining up bottom with edge of paper and about 1 ½” from end. Use side of carton to make folds on paper. Turn carton to next side. Repeat step with last side.
3. Lay ruler along pencil line and crease paper over ruler. Remove ruler then run a finger over for a sharp fold. Repeat with all lines.
4. From another piece of paper, cut a strip to fit over opening of paper since paper won’t fit around carton. Cut about 1” wider than opening.
5. To cover carton, apply double sided tape to one side of carton then press onto paper with corners at creases, lining up bottom of carton with edge of paper then press to secure. Repeat step with remaining sides then glue strip along back to cover opening.
6. Trim excess around top to about 2” from edge of carton. Use scissors to snip down each corner to carton. Apply glue to underside of flap then fold to inside pressing to secure.
7. Cut out patterns from pattern sheet or create your own. Trace onto cardstock and cut out. Cut out round, triangle and rectangle shapes for sides as shown. Glue all paper pieces into place.
8. To create eyes, glue desired size eye onto paper then trim leaving a slight border. Glue to another paper then trim again creating wider a border. Layer as many times as desired then glue in place.
9. Fuzzy Sticks can be twisted around pencil for a curly look, then add pom pom details. Tip: when working with pom poms it is better to spread the fibers of the pom apart, add a dot of glue, place where desired then press to secure.
Read NextDIY Floral Chalkboard