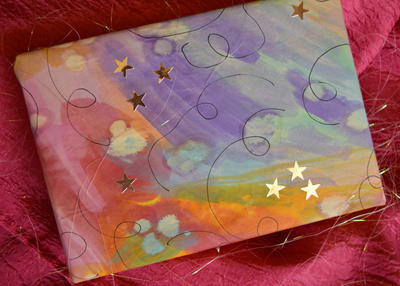
Expressive Art Christmas Gift Wrap

If you're looking for an idea for Christmas art projects for kids that would be ideal for an art class or to do as part of a family’s Christmas preparations, then look no further. You can turn plain newspaper into this beautiful Expressive Art Christmas Gift Wrap. The beauty of these Christmas art projects is that there is no right or wrong. It is a wonderful way to explore with colors and makes easy Christmas art for kids for an introduction to watercolors. Depending on the child’s age, these Christmas arts and crafts might require some adult supervision, but they can easily be adjusted for children from different age groups.
Estimated Cost$21-$30
Time to CompleteIn an evening
MaterialsPaint, Paper, Recycled Materials
Primary TechniquePainting

SeasonWinter
HolidayChristmas
Age GroupPreschool & Kindergarten
Materials List
- Unprinted newsprint paper
- Small self-adhesive silver star stickers
- A few drops each of yellow and red liquid food colorings
- 1 teaspoon of thin household bleach
- Cotton ear bud
- Staedtler 12-color watercolor set
- Black Artline 210 Fineliner Pen
- Elmer’s Poster Tack
- Small plastic bowl with water
- Extra small plastic bowls for bleach and food colorings
- Iron and ironing board
Instructions
-
Use a piece of Poster Tack on each corner of the strip of unprinted newsprint paper and stick it to a flat working surface.
-
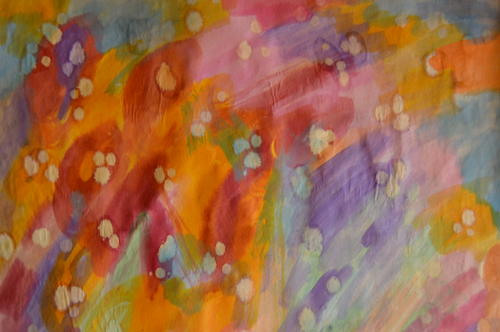
Use a combination of thinned water color paint or food colorings to paint the strip of unprinted newsprint paper. Use blotches of different colors to create a more interesting effect. Allow to dry thoroughly.
-
Depending on the age of the child, this step might require adult supervision. Dip the end of the ear bud into the bleach and lightly press the wet ear bud on random places on the paper. Allow to dry thoroughly.
-
Depending on the age of the child, this step might require help from an adult. Using a low heat setting, iron the paper between two sheets of brown paper to flatten it out.
-
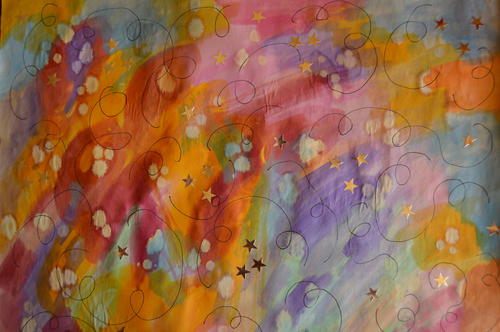
Stick silver stars in random places on the paper.
-
Use the black pen to draw squiggles between the stars.

Read NextGumdrop Blizzard Homemade Ornaments
Your Recently Viewed Projects
Thanks for your comment. Don't forget to share!
achumley0003 31706 34
Nov 08, 2016
This is a great idea! I wish I had thought of this before. This is would be a great way of letting the kids personalize family's gifts and also allow them to have fun while doing so. And even the younger kids could do it.
Report Inappropriate Comment
Are you sure you would like to report this comment? It will be flagged for our moderators to take action.
Thank you for taking the time to improve the content on our site.