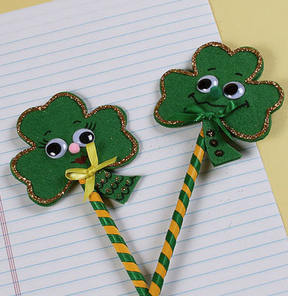
Shamrock Pencil Toppers
Top o' the pencil! Celebrate St. Patrick's Day in style with these Shamrock Pencil Toppers. Kids will love transforming this everyday school supply into a colorful new friend. This tutorial will teach you how to make two different versions of these lucky little pals: a boy and a girl. These St. Patrick's Day crafts for kids are a simple way to show your spirit for the holiday, and you could easily make a few for your friends, too.

Materials:
- Tulip® Fabric Markers®: Multi 12 Pack (26662)
- Tulip® Fashion Glitter®: Gold Fine (23540)
- Tulip® Dimensional Fabric Paint: Yellow (65002)
- Aleene's® Original Tacky Glue®
- Small pom poms – 1 green, 1 pink
- Wooden clothespins – about a dozen
- (2) Pencils new, yellow
- Pencil
- Scissors
- Googly eyes – 4
- Paper towels
- White paper – 1 sheet
- Gold ribbon, ¼”, approximately 6” long
- Green ribbon, ¼”, approximately 30” long
- Stiff felt – green
-
Masking tape
Instructions:
1. Trace shamrock pattern on stiff felt with pencil. To create mirrored shamrock, flip over pattern and trace around with stem going in reverse direction. Trace two pairs of shamrocks – one for the boy and one for the girl. Cut out and set aside.
2. Cut two 10-11” lengths of green ribbon. Cover work surface with paper towel. Lay ribbon flat on paper towel. Squeeze a thin line of Aleene’s® Original Tacky Glue® along length of ribbons. Let sit and set up about 5 minutes so it is not too “squishy” but has a nice tack.
3. Starting from top, carefully wind ribbon around pencil and stop about an inch or so above the lead point. Cut excess ribbon at end. Set pencils aside to dry.
4. Glue googly eyes on one side of shamrock for both girl and boy. Glue pink pom pom for girl’s nose and a green pom pom for the boy.
5. For the girl, use Black marker to draw eyelashes and eyebrows and Red marker to draw lips.
6. For the boy, draw Black eyebrows and a wide smile.
7. Take shamrock pieces without faces and apply glue about an inch up from the lower portion of shamrock not including stem. (Make sure glue is applied to correct side of shamrocks so stems will align for pressing shamrocks together.)
8. On shamrock with glue, place top eraser portion of pencil into the glue. Secure with piece of masking tape and let dry.
9. On the shamrock that is attached to the pencil, squeeze a line of glue following edges of shamrock. Lay the shamrock with the faces on top and press shamrocks together. Secure the glued edges, including bottom of stem, with clothespins until dry.
10. Remove clothespins. Lay piece of white paper below project. Squeeze a line of yellow Tulip® 3D Fashion Paint around the edges of the fronts of both boy and girl shamrocks. Sprinkle with Gold glitter and let set until dry. Dust off excess glitter onto white paper. Crease center of paper and pour excess glitter back into bottle. Let dry.
11. Repeat with the reverse side of shamrock.
12. With remaining green ribbon, tie a bow for the boy. With gold ribbon, tie a bow for girl. Glue bows to tops of stems on each shamrock.
13. Embellish with additional glitter as desired.
Read NextLucky Mason Jar Luminaries