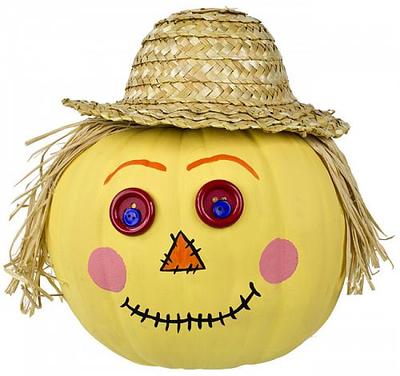
Scarecrow Pumpkin with Straw Hat

Looking for adorable no-carve pumpkins to make with your kids? Try a Scarecrow Pumpkin with Straw Hat. This easy Halloween craft has a cute rustic look and is a great project for kids to help with. Painted pumpkins are a simple alternative to carved pumpkins that work well as indoor or outdoor decorations. Use them as a festive centerpiece or display them outside. This brightly colored craft is sure to catch the eyes of all your neighbors this fall, especially when they know that your little guy or girl made it themselves!
Time to CompleteIn an evening
MaterialsPainting & Coloring
Age GroupElementary School, Pre-Teens
Americana® Acrylics
- Jack-O'-Lantern Orange (DA229)
- Lamp (Ebony) Black (DAO67)
- Melon (DA251)
- Moon Yellow (DAO7)
Other Supplies
- water container
- palette or plastic plate
- paper towels
- scissors
- 3/4" flat brush
- #4 round brush
- hot glue gun and glue sticks
- 1-1/4" sponge pouncer (Americana Dual Sided Pouncers - DABK19)
- raffia
- medium white foam pumpkin
- two large and two small buttons
- small straw hat
Instructions
-
Use the 3/4" flat brush to paint the entire pumpkin Moon Yellow.
-
Use the #4 round brush with Jack-O'-Lantern Orange to paint on the triangle nose and eyebrows.
-
Use the same brush with Lamp Black to add stitching on the nose and for the smile.
-
Use a 1 1/4" pouncer dipped in Melon for cheeks.
-
Use scissors to cut the raffia to hair length of choice.
-
Hot glue big buttons on for the eyes, small buttons for pupils, raffia for hair, and a hat on the top of the hair.
-
NOTE: Let dry completely between painting steps.
Read NextScarily Thrifty Monsters