This project was submitted by one of our readers, just like you.
Toilet Paper Roll Satellite Craft

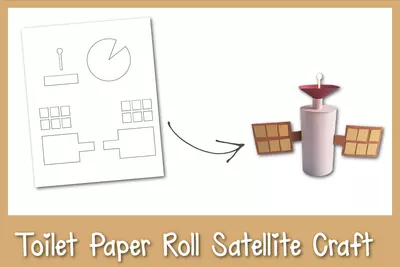
Toilet Paper Roll Satellite Craft
"If you have a space lover, this Toilet Paper Roll Satellite craft is for you! Gone are the days of boring, 2D projects. This 3D satellite is sure to entertain your space loving kid for hours! After putting together the simple craft, your kids can blast off to fun while pretending to be an astronaut working on a satellite in space, or using the satellite to photograph deep space. Get your kids thinking and learning more about space with this fun, simple papercraft. "
Primary TechniquePaper Crafts

Materials List
- Construction paper
- Empty Toilet Paper Roll
- Craft glue
- Pencil
- Scissors
Instructions
-
Cut out a piece of construction paper from a color of your choice to cover the TP roll. Trace the circumference of the roll on the same color of paper. Then, cut out the traced circle. Cut a small strip of paper also from the same color (make sure the dimensions of the strip are about 6 cm X 2 cm). Once you’ve cut out the strip, roll it into a cylinder shape. Next, you will glue the small cylinder on the center of the circle cutout.
-
Next, trace the template patterns on sheets of construction paper. You can choose which colors to use. The template includes the panel base, panels (the small squares), a dish cone, and a feed horn. I’m using golden glossy paper for the panels.
-
Next, arrange six of the panels in two rows on one panel base. Once you have them in the right place, grab your glue stick and attach the panels to the panel base. Repeat with the other panel base and the remaining panels.
-
Fold the small ends of the panel bases a centimeter in. Once you have created this tab on both panel bases, apply glue on them. At this time, you can also glue the round paper with the cylinder attached from step one on either open end of the TP roll.
-
Attach the panel base cutouts on both sides of the TP roll.
-
Once the panel bases are attached, you can move on to creating the dish cone. Start by tracing out the template for the dish cone on your desired color of construction paper. Once you’ve traced the pattern out, grab your scissors and cut the shape out.
-
Carefully roll the cone template and join the two open ends with glue to form the dish cone. You can also glue the antenna to the center of the dish cone at this time.
-
Next, attach the point of the dish cone to the top of the cylinder that extends from the covered end of the TP roll.

Read NextMermaid Wand Craft For Kids