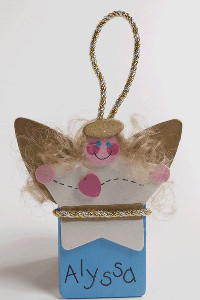
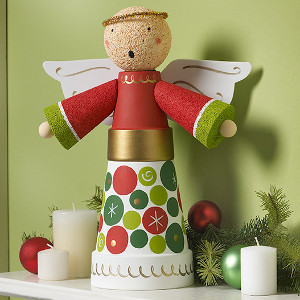
Sweet and Simple Wooden Angel
This Sweet and Simple Wooden Angel will make you sing with joy! You can make this easy kids' Christmas craft as a homemade Christmas ornament, or hang it on your doorknob to decorate for the holiday. Write your name, or write a message to a loved one to wish them a Merry Christmas. The Sweet and Simple Wooden Angel is a beautiful Christmas craft for kids that you'll be proud of for years to come.

Materials:
- FolkArt ® Metallics - Rose, 2 oz.
- FolkArt ® Metallics - Antique Gold, 2 oz.
- FolkArt ® Metallics - Pearl White, 2 oz.
- FolkArt ® Metallics - Blue Pearl, 2 oz.
- 2 small wooden circles
- medium wooden circle
- small wooden oval
- 2 XL teardrops
- 3” rounded star
- 2” x 3” rectangle
- ½” traditional heart
- 14” gold gift wrap cord
- Twisted silver/gold cord
- Curly doll hair
- Foam plate for paints
- 1/2” brush
- 1/4”flat brush
- Small round brush
- Ruler
- Scissors
- Black ultra fine point permanent marker
- Low temp glue gun
Instructions:
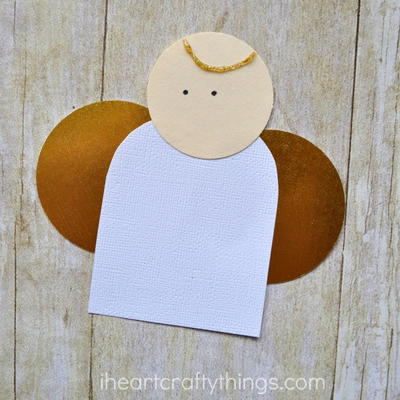
- Mix one part Rose with two parts Pearl White. Use mixture to paint all circle shapes; let dry.
- Use Rose to paint heart shape and circles for cheeks on large circle; let dry.
- Use large flat brush and Blue Pearl to paint rectangle shape. Use end of paint brush handle dipped in Blue Pearl to paint dots for eyes on large circle; let dry.
- Use Pearl White to paint star shape; let dry.
- Use Antique Gold to paint oval and teardrop shapes; let dry.
- Refer to photo for placement and use ¼” flat brush and Antique Gold to paint stripe across star for sash; let dry.
- Referring to photo for placement, glue lower two points of star over one end of rectangle.
- For wings, glue rounded ends of teardrop shapes to back of upper star.
- For face, glue large circle over upper center tip of star.
- For halo, glue oval over top edge of circle, securing at back with extra glue.
- For hands, glue small circles over middle star tips.
- Refer to photo for placement, and glue heart on star.
- Cut an 8” piece from cord. Fold in half to form loop for ornament hanger and glue ends to back of star/head.
- Wrap and glue remaining piece of cord over center of sash stripe, with ends of cord meeting at back center; trim ends as necessary and secure well with glue.
- Use marker to add dashed line for heart garland between hands, mouth on angel face, and personalization at lower front.
- Cut doll hair to desired length and glue center of length to back of halo/head to hold in place. To hold hair in position, add small amount of glue over wing and at back of hands.
Read NextOld Newspaper Christmas Tree Craft