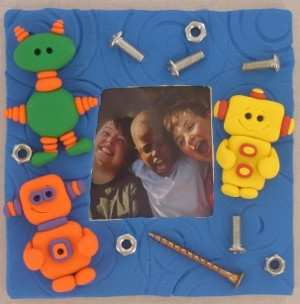
Nuts n Bolts Robot Frame
Learn the nuts n bolts of kids' sculpting, or if you're "rusty," sharpen up. For a fantastically fun homemade picture frame, craft the Nuts n Bolts Robot Frame to house one of your favorite pictures. This is a great family activity where each person can work on a different robot. You'll love comparing the robots when they're all complete. If three robots isn't enough for you, see if you can create your own unique robot using the method from Polyform. Make sure the robots are doing their jobs by commanding them to make you look extra good in the picture, because you can program that in, ya know!
Materials:
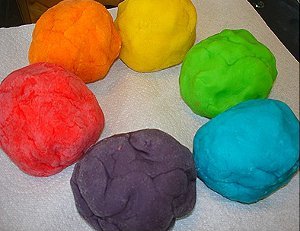
- Sculpey® Bake Shop: Blue - 2 oz-- 1 block
- Sculpey® Bake Shop: Green - 2 oz-- 1 block
- Sculpey® Bake Shop: Yellow - 2 oz-- 1 block
- Sculpey® Bake Shop: Red - 2 oz-- 1 block
- Sculpey® Bake Shop: Orange - 2 oz-- 1 block
- Sculpey® Bake Shop: Purple - 2 oz-- 1 block
- Sculpey® Bake Shop: Black - 2 oz-- 1 block
- Clay Conditioning Machine
- Sculpey Acrylic Roller
- Tool set
- Mini wood frame 4" x 3"
- Nails, nuts, bolts, screws
- Stamp for texture
Tips:
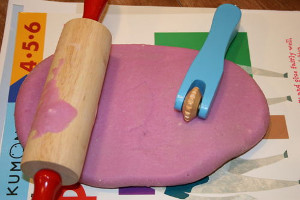
- Do not use unbaked clay on unprotected furniture or finished surfaces. Start with clean hands and work surface area. Good work surfaces include wax paper, metal baking sheet, or disposable foil. Knead clay until soft and smooth. For best results, clean your hands in between colors. Shape clay, pressing pieces together firmly. Bake on oven-proof glass or metal surface at 275 °F (130 °C) for 15 minutes per 1/4” (6 mm) thickness. For best baking results, use an oven thermometer. DO NOT USE MICROWAVE OVEN. DO NOT EXCEED THE ABOVE TEMPERATURE OR RECOMMENDED BAKING TIME. Wash hands after use. Baking should be completed by an adult.
Instructions:
For the frame-
-
Using the Sculpey Acrylic Roller, roll out the blue clay into a flat sheet. Spray stamp with water, and stamp blue clay to make pattern.
- Gently place the frame on top of the blue clay. Using the knife tool, gently cut around the outside edge and inside window, leaving a little bit of excess clay around the edges. Gently push the excess clay around to the backside of the frame to cover edges.
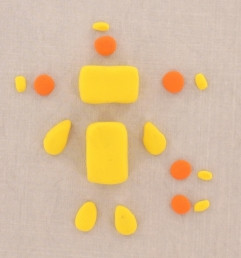
For the yellow robot-
-
Using the yellow clay, make one 9/16” ball. Using your fingers, gently shape into rectangle for head.
-
Make one 5/8” ball. Using your fingers, gently shape into rectangle for body.
-
Make two 5/16” balls into egg shapes, and flatten bottom for feet.
-
Make two 3/8” tear drops for arms.
-
Using the black clay, make two tiny balls for eyes. Use the pointed end of the modeling tool to make 2 small holes in the face to press the eyes into.
-
Make several small balls of red and yellow and shape into squares for buttons and antenna.
-
Assemble robot as pictured. Using the modeling tools, draw lines on face for eyebrows and mouth.
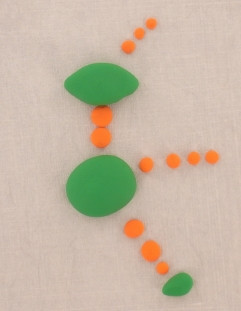
For the green robot-
-
Using the green clay, make one 7/8” ball into a circle, and gently press to work surface to flatten back side for body.
-
Make one 11/16” ball into oval with pointed ends for head.
-
Make two 5/16” balls into oval for feet.
-
Using the orange clay, make a 5/16” and a 1/4” ball and flatten for neck.
-
Make various sized orange balls and flatten for arms (4), antennae (3), and legs (3).
-
Using the black clay, make two tiny balls for eyes. Use the pointed end of the modeling tool to make 2 small holes in the face to press the eyes into.
-
Assemble robot as pictured.
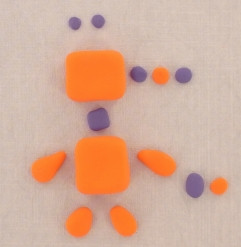
For the orange robot-
-
Using the orange clay, make one 3/4” ball. Using your fingers, shape gently into square for head.
-
Make one 11/16” ball. Using your fingers, shape gently into square for body.
-
Make two 5/16” balls into egg shape and flatten to bottom for feet.
-
Make two 3/8” balls into tapered logs for arms; attach to side of body.
-
Using the purple clay, make one purple 1/4” ball and flatten for neck.
-
Make two 1/8” balls of purple and flatten. Press to head for eyes.
-
Using black clay, make two tiny balls for eye centers. Use the pointed end of the modeling tool to make 2 small holes in the eyes to press the eye centers into.
-
Make several sizes of purple and orange balls; shape into squares for buttons and antenna.
-
Assemble robot as pictured.
-
Press robots to frame and gently press screws, nuts, etc. to frame before baking.
- Bake on oven-proof glass or metal surface at 275° F (130 °C) for 15 minutes per 1/4" (6 mm) of thickness. DO NOT USE MICROWAVE OVEN. DO NOT exceed the above temperatures or recommended baking time. Baking should be completed by an adult.
Always press pieces together firmly before baking!
Read NextNo Nonsense No Bake Clay Dough