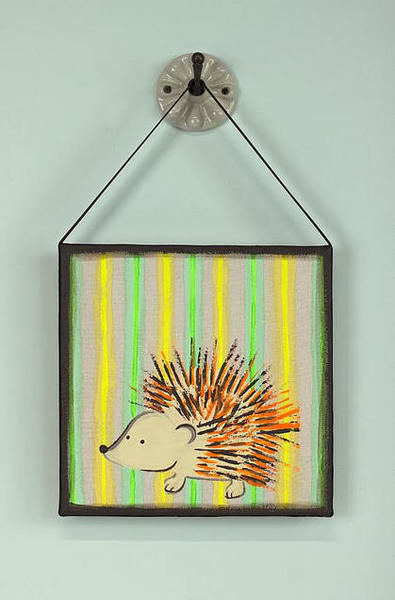
Porcupine DIY Wall Art
While you can’t exactly cuddle a porcupine, you can certainly paint one for your wall! Porcupine DIY Wall Art is a fun painting project for kids who love animals. Boys and girls alike will love creating their own piece of wall art; they even get to try painting with a fork! Kids can customize the paint colors to match their bedroom decor, too. Creating this decorative craft is easy as can be, thanks to the free printable template included below, so your little ones are sure to love this project.

Materials:
- Americana® Multi-Surface Acrylics:
- Almond (DA540)
- Battleship (DA549)
- Bittersweet (DA547)
- Chick (DA543)
- Green (Neon) (DA558)
- Orange (Neon) (DA556)
- Soft Jade (DA545)
- Yellow (Neon) (DA557)
- Water container
- Palette or plastic plate
- Paper towels
- #10 flat brush
- #8 round brush
- 12" x 12" canvas
- Plastic fork
- Template
Instructions:
- Using a #10 flat brush, paint vertical stripes on the canvas (leaving part of the canvas exposed) by alternating Soft Jade and Chick. Using a #10 flat brush, start painting the porcupine's body in Almond.

- Using a #8 round brush, paint the head, ears, and feet in Almond. Use the #8 round brush with Bittersweet to outline the face, ears, and feet and then to blend the outline with Battleship.

- Using a #8 round brush, paint a thin stripe in the middle of the stripes, Neon Yellow over Chick and Neon Green over Soft Jade. Using a #8 round brush, paint the eyes, nose, and highlight the face, ears, and feet in Bittersweet. Use a plastic fork to slide Bittersweet to make the porcupine's needles.

- Using a plastic fork, continue adding quills to porcupine in Neon Orange and Bittersweet. Use a #8 round brush and Bittersweet to paint the eyes and nose and to loosely outline the face, ear, and feet. Use a #10 flat brush and Bittersweet to paint the sides and dry-brush the perimeter of the canvas.

- Optional: Glue ribbon in a complementary color to the canvas sides and bottom with craft glue. An extra length of ribbon can also be used as a hanger.
Read NextPaper Chain Decorations
Your Recently Viewed Projects
Thanks for your comment. Don't forget to share!
Marilyn B
Aug 24, 2017
This,little,porcupine design is so cute...you could even adapt him a bit to be a hedgehog, if that is your fancy! The colors are pretty and the instructions are just great! If you have different decor, you could change out the paint colors to suit you. This would make a cute baby shower gift. Thanks for sharing!
Report Inappropriate Comment
Are you sure you would like to report this comment? It will be flagged for our moderators to take action.
Thank you for taking the time to improve the content on our site.