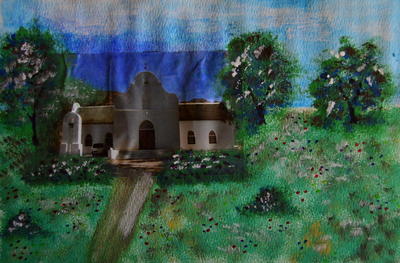
Art Inspiration Landscape Technique

Here is a fun way to teach landscape painting techniques to older kids in an art class or similar setting! This Art Inspiration Landscape technique involves cutting a picture from a magazine, gluing it to watercolor paper, and then adding features to the paper to make the cutout part of the paper. These art techniques can work well as an art lesson for a group of teenagers. Best of all, these painting techniques are a great way to inspire creativity for an age group that's just discovering their inner Monet!
Estimated Cost$21-$30
Time to CompleteWeekend project
Primary TechniquePainting

Age GroupPre-Teens, Teens
Materials List
- A4-sized 140GSM watercolor paper
- Picture of a country house or church, cut from a magazine
- Set of 18-color Kaibo watercolor tubes
- Felt-tip pens: red, purple, yellow, and navy blue
- Quick-drying craft glue (such as Bostik Clear)
- Clear packing tape
- 6/32" flat paintbrush
- 4/32" thin round paintbrush
- Sponge - use one that was inside a medicine bottle
- Standard scissors
- Ruler
- Pencil
- Plastic tray with a bottom that is bigger than A4
- Palette and small bowl of water
Instructions
-
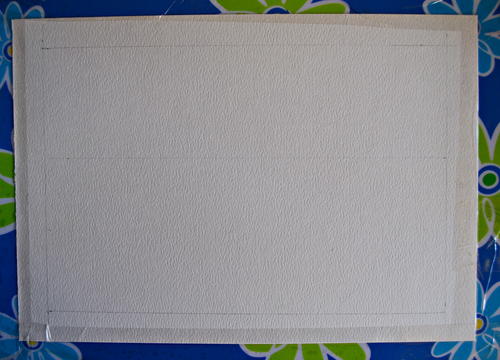
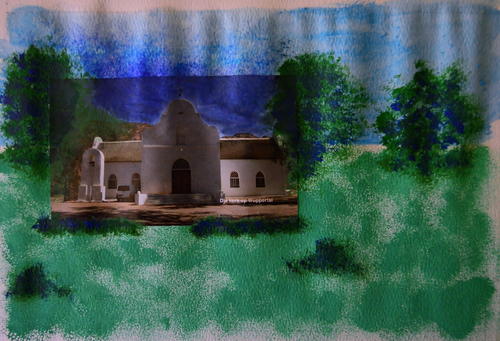
Place the watercolor paper flat down in the bottom of the tray. Tape each side of the paper to the bottom of the tray. This will prevent the paper from warping too much when painting.
-
Use the pencil and ruler and draw a pencil frame 0.7' from the edges of the paper. Draw a horizon line 2.6" from the top frame line.
-
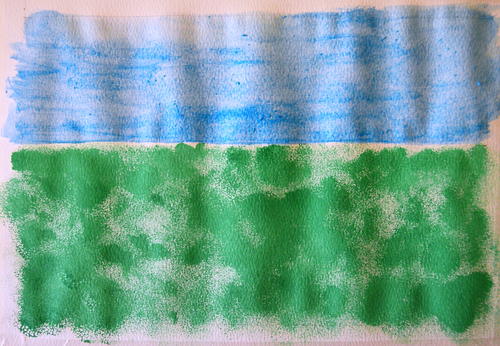
Use the flat paintbrush and cerulean blue to paint the area above the horizon line. Use the sponge and the sap green to sponge paint the area below the horizon line. Note: This is the only step that requires using a wet brush or sponge - for the rest of the steps, use a paintbrush that is only slightly wet.
-
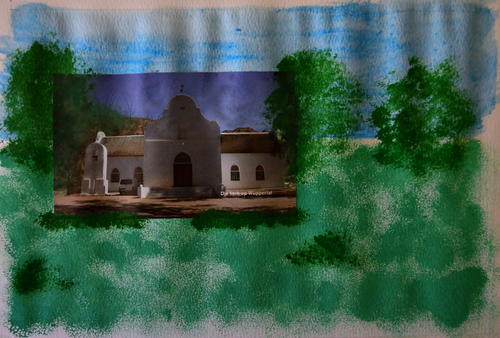
Glue the picture cut from the magazine to the watercolor paper.
-
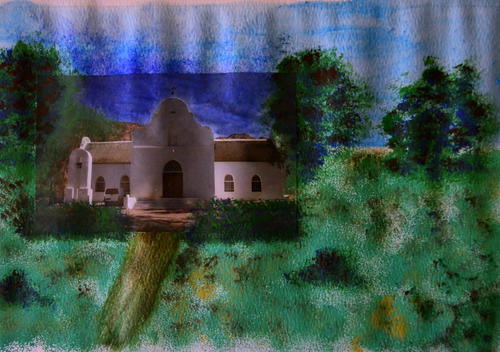
Use the flat paintbrush and green pale and dab small green strokes to add trees and bushes to the paper.
-
Use ultramarine to blend the sky on the picture cutout with the sky on the paper. If necessary, add paint to the sky on the cutout too. Dab some ultramarine onto the trees and bushes.
-
Use yellow ochre to draw a driveway leading to the house. Deepen the color of the driveway with burnt umber. Also dab some yellow ochre and burnt umber onto the trees, bushes, and grass. (Once the driveway is in place, if necessary, you can add more height to the bushes in front of the house - remember to use green pale, ultramarine, burnt umber and white when doing so!)
-
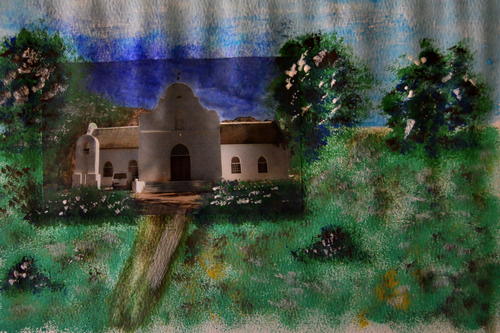
Use titanium white to add clouds to the sky. Also dab some titanium white onto the trees, bushes, and grass.
-
Use the thin round paintbrush and black paint to add tree trunks.
-
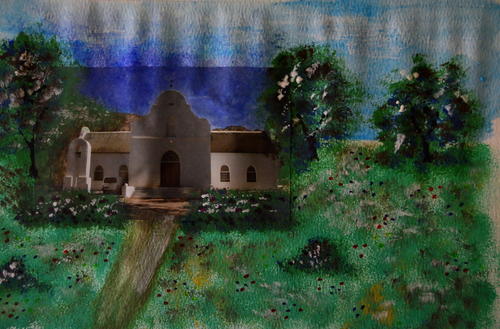
Use the felt-tip pens to add small circles all over the grass to add wildflowers.
-
Allow to dry before removing the completed landscape from the tray.

Read NextStill Life Flower Vases