This project was submitted by one of our readers, just like you.
Paper Bag Reindeer Puppet

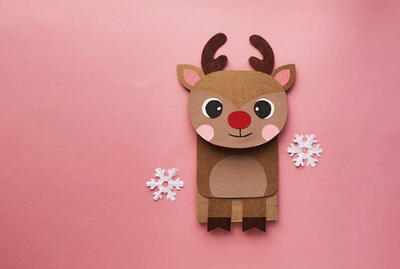
Paper Bag Reindeer Puppet
From the blogger: "Holiday Season is filled with all kinds of joy; family, friends, and all sorts of events and errands! This paper bag Reindeer puppet is the PERFECT way to entertain your kids during all the holiday to-dos. This activity is a great idea for a cozy family night in, a snow day from school, or indoor recess for our schoolteachers! This easy and fun activity can even become a tried and true family tradition for the holiday season! With just a paper bag, some colorful paper, glue, scissors, and markers you are well on your way to creating your kids new holiday friend!"
Primary TechniquePaper Crafts

Materials List
- Colored Paper
- Paper Bag
-
Craft Glue
- Pencil
- Markers
- Scissors
Instructions
-
You will need three different shades of brown (light, medium, and dark colored) as well as a red and pink sheet. After you have chosen your colors, you will begin tracing. On the medium brown shade, trace the head, body, legs, and ear patterns. On the light brown shade, trace the belly and face patterns. Then you will trace the horns and the hoof patterns on the dark brown paper. Next, trace the inner ear patterns and the blush patterns on the pink paper. Finally, you will trace the nose on the red paper. You can use the eyes directly from the template. Now that everything is traced, grab your scissors and carefully cut out the patterns.
-
Now you will start gluing. Grab the belly cutout and glue it along the bottom side of the body base cutout (the rounded side is the bottom). Next, you will glue the inner ear cutouts (pink) in the middle of the main ear cutouts (brown). Then you will glue the face cutout along the bottom side of the head cutout. Also glue the hoof cutouts along the bottom side of the leg cutouts, making sure to match up all the edges.
-
Now we will work on putting the head together. First, start by attaching the horns on the top side of the head pattern. Next, you can glue the ears onto the head, placing them on the outer sides of each horn.
-
Start creating the face by gluing the blush cutouts (pink) on both cheeks. Then attach the nose cutout in the middle of the face.
-
Finish the face by gluing the eyes on the top side of the face. Use a sharpie or gel pen to draw the mouth of the papercraft reindeer.
-
Select a paper bag appropriate for the size of the papercraft reindeer. If you do not have a paper bag on hand, you can craft your own from brown paper or wrapping paper. Attach the leg patterns near the open end of the bag, keeping the hoof parts slightly hanging past the end of the bag. The open side of the bag will be the bottom side of the papercraft reindeer.
-
Attach the body pattern on the top side of the legs, keeping the belly part of the body pattern near the legs.
-
Finally, flatten the bottom side of the paper bag, creasing the flap to face the reindeer’s body. Glue the head of the reindeer puppet onto that flap. Enjoy your completed Reindeer Puppet Paper Craft!

Read NextClothespin Hungry Fish