This project was submitted by one of our readers, just like you.
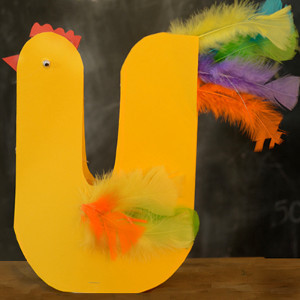
Simple Origami Chicken

Simple Origami Chicken
"Needing an easy activity for your kids? Try this fun cute origami chicken! This Origami Chicken is the perfect project for the origami novice. Most of the folds are very simple, and the pictures make it easy to follow the instructions. With just some paper you are on your way to creating this cute chicken. This is perfect to make with your children or let them learn how to follow step-by-step instructions by themselves. Whatever way you choose to have your kids make this cute origami chicken they are going to love it! "
Primary TechniquePaper Crafts

Materials List
-
Colored origami paper or light construction paper
-
Sharpie
-
Craft glue
Instructions
-
Prepare a square paper. Fold the paper in half diagonally, unfold, and then fold diagonally from the other corner. Unfold the paper again.
-
With the paper facing you so that the creases make an X, fold the upper two corners in until the points touch the center.
-
Fold the lower two corners of the square into the center in the same manner.
-
Fold all four corners of the current square into the center again.
-
Unfold 2 opposite corners
-
Fold this pattern in half along the long side, keeping the corner flaps on the outside.
-
Hold the side flaps in place and fold out one of the open corners. Push the fold in the opposite direction so that you have a downward-pointing triangle.
-
Fold out the side nicely and flatten it with the rest of the pattern.
-
Similarly, fold out and flatten the other side. The current pattern should have 1 big triangle with two smaller triangles sticking out the bottom. The big triangle will be the chicken’s body. One of the small triangles is the head and the other is the tail-feather of the chicken.
-
Fold one of the small triangles across the body of the chicken. This fold is done to have a neat crease line.
-
Unfold the last fold.
-
Use the crease you just made to fold the triangle the other direction. The point of the triangle should be visible to the side of the chicken. This is the beak.
-
Fold the tip of the tail feather towards the back of the chicken. Trace and cut out a comb pattern and an eye. Attach the comb along the top of the head and glue the eye below the comb to complete the craft.

Read Next13 Rainbow Loom Animals