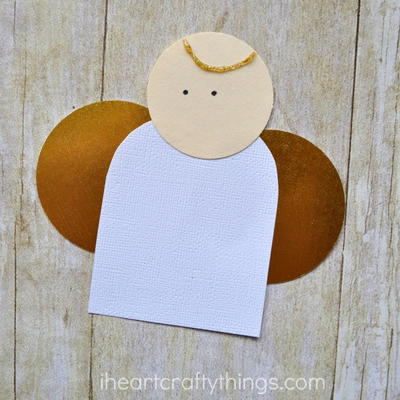
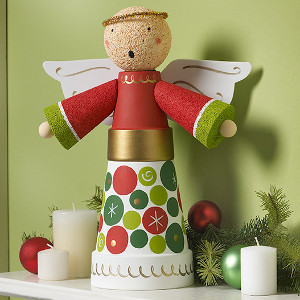
Cheerful Cone Angel Family
These personalized angel craft ideas are truly one of a kind. The Cheerful Cone Angel Family will allow you to transform a few photos of your family members into stunning homemade Christmas decorations. These recycled crafts for kids look so elegant when they're finished that you'll want to show them off to everyone that comes over. You can use newspaper or old book pages to make your Cheerful Cone Angel Family, or you can find glittery scrapbook paper to give your new craft a special touch.

Materials:
- FolkArt ® Acrylic Colors - Coffee Bean, 2 oz.
- Mod Podge ® Matte, 8 oz.
- Two 3” balls (Adult Heads)
- One 2-1/2” ball (Kids Head)
- Two 3-7/8” x 11-7/8” cone (adult body)
- One 2-7/8” x 5-7/8” Cone (kids body)
- Nine 12” x 12” Pieces of different shades of brown and tan scrapbook paper
- Twine (bow around neck)
- Old book (thrift store find)
- Scissors
- Black and white photo copied photos
- Hot glue
- Pencil
Instructions:
- Base coat the bottoms of all the cones with Coffee Bean. Allow to dry.
- Using all the different shade of brown and tan paper, start tearing the paper and gluing them to the cones until completely covered. Flatten the front of the heads for the faces. Tear smaller pieces of scrapbook paper for the heads. Cut out a circle for the faces and glue with Mod Podge.
- Allow to dry. Glue the heads onto the top of cones. Add a coat of Mod Podge to all parts. Allow to dry. Tie twine into a bow around the neck of each angel.
- Tear pages out of the old book and layer into six groups of five; use the Mod Podge to glue them together. For the last page that is showing, wrinkle in your hand and then glue to the rest of papers. Cut out one wing on each group of papers. Glue them together at the center and then cut a rectangle out of the leftovers to glue to the seam on the front and back of wings. This will add extra support. Glue the wrinkled side to the back of the angels so that you can see the wrinkle side.
PROJECT TIP: Make a flat side on the Styrofoam balls by pushing them with both hands into a hard flat surface.
Read NextOld Newspaper Christmas Tree Craft