3D Cupcake Wall Decor
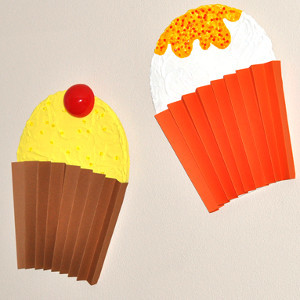
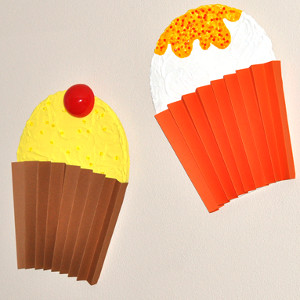
These delicious treats look so real that you'll want to eat them, but you'll refrain because they make your room fabulous. Impress all of your friends with 3D Cupcake Wall Decor that will make your space the sweetest. As you put together these food crafts, you'll find that time flies by. They're easy crafts for teenagers, and they're a blast to make, so you'll be ready to display your sweet treats in no time. Your walls will be talking when you grace your room with the presence of cupcake art.
Materials:
For white cupcake:
- 3D Washable Glitter Glue Pens, Yellow
- 19 1/2" x 25 1/2" sheet of orange artist paper - Canson
- Yellow/red/orange crafting beads - Jewelry Essentials
For yellow cupcake:
- 19 1/2" x 25 1/2" sheet of brown artist paper - Canson
- Crafting beads, yellow - Jewelry Essentials
- 80 mm diameter clear ball ornament - Darice
- Holiday red spray paint - Color Tool by Design Master
- Acrylic paint, yellow
- Newspapers
- Small plastic container
- Button shank remover or craft cutter
For both:
- Elmer's Foam Board White, 20" x 30" x 1/2"
- Craft Bond Tacky Glue
- X-ACTO Gripster Knife (and new blade)
- X-ACTO Self-Healing Cutting Mat
- Acrylic ruler
- (3) 4 oz. tubes dimensional paint - Texture Magic by Delta
- 12" length of 3/8" wide orange ribbon
- Cake spatula or table knife
- Large bowl (for pattern)
- Old newspapers
Instructions:
FOR WHITE CUPCAKE WALL DECOR:
- To draw cupcake on Elmer's Foam Board, use pencil and acrylic ruler to draw 9" x 12" vertical rectangle. To taper rectangle for cupcake bottom, measure and mark in from bottom left side 1 3/4". Similarly measure in from bottom right side 1 3/4". Draw lines from top corners of rectangle down to marks at bottom. To draw rounded top of cupcake, trace around half of a large bowl positioned on top of rectangle. An adult should use Elmer's X-ACTO Knife (with new blade) and acrylic ruler on Cutting Mat to cut Foam Board into cupcake shape. (Hint: Score lightly first and then press more firmly to cut deeper with several passes of the knife. Replace blades often.)
- For white frosting, squeeze 1 - 1 1/2 tubes of textured paint onto top section of cupcake and spread with spatula or knife. Spread and swirl as desired. Let dry.
- For yellow icing, draw a scalloped line using Elmer's Yellow 3D Glitter Pen. Fill in yellow icing area using glitter pens. While still wet, sprinkle beads into paint. Let dry.
- For cupcake liner, trim orange paper to 9 3/4" x 25 1/2". Starting on one short end, make 1" wide accordion folds in orange paper. Use Elmer's Craft Bond Tacky Glue to attach right and left ends of liner to outside edges of cupcake. Let dry.
- Hold cupcake at desired angle to determine top and mark on back. For hanger loop, overlap ends of a 6" length of ribbon and glue to mark on back of cupcake. Let dry before hanging.
FOR YELLOW CUPCAKE WALL DECOR:
- Follow White Cupcake, Step 1 to draw and cut cupcake shape from Elmer's Foam Board.
- For "cherry", use button shank remover to carefully snip off hanger loop from one of the ball ornament halves. (Set aside other half for another project.) In a well-ventilated area protect work area with newspapers. Using red paint, spray inside of one of the ball ornament halves. Let dry.
- In plastic container, squeeze out 1 1/2 tubes of texture paint. Add yellow acrylic paint a few drops at a time, and mix until desired color. Spread mixture onto top section of cupcake and spread with spatula or knife. Spread and swirl as desired. While still wet, press beads into paint. Push red cherry into paint at top. Let dry.
- Follow White Cupcake, Steps 4 and 5 to make and glue brown paper liner and hanger loop on back.
Read NextPaper Chain Decorations

