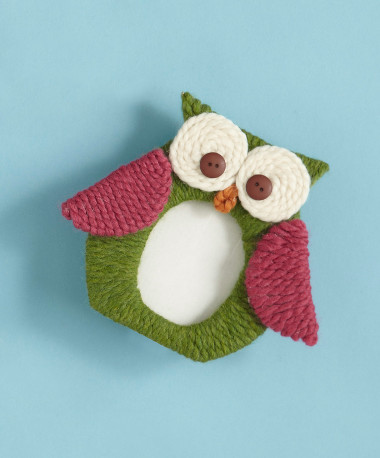
Yarn-Wrapped Owl Picture Frame
Whooooo wouldn't love to see this adorable Yarn-Wrapped Owl Frame in their home? This is one of the most charming yarn crafts you'll ever see. DIY picture frames are great teen crafts, since older children love all projects that allow them to express their personal style, and this frame is no exception. With the free printable template, kids can craft this Yarn-Wrapped Owl Frame with ease. Plus, you will have plenty of yarn leftover once you're finished, so you can make as many frames as you want!

Materials:
- 1 ball of 640-131 Wool-Ease Thick & Quick Yarn: Grass
- 1 ball of 640-112 Wool-Ease Thick & Quick Yarn: Raspberry
- 1 ball of 640-099 Wool-Ease Thick & Quick Yarn: Fisherman
- 1 ball of 640-136 Wool-Ease Thick & Quick Yarn: Apricot
- 2 buttons, about 3/4 in. (2 cm) diameter
- Stiff cardboard
- Craft glue
Instructions:
- From cardboard, cut the following:
2 circles, each 2 in. (5 cm) in diameter for eyes
One circle 3 1/2 in. (9 cm) in diameter, then cut this circle in half for wings
One 3 1/4 x 4 3/4 in. (8.5 x 12 cm) rectangle for frame backing
One 1 in. (2.5 cm) wide strip, 9 1/2 in. (24.5 cm) long for easel - Print out owl shape template. Cut out shape, then cut out the center portion of the shape for the frame opening.

- Lay template onto cardboard and, with a pencil, trace around shape onto cardboard. Cut out cardboard shape.
- For the frame, cut a 24 in. (61 cm) length of Thick & Quick Yarn: Grass (A) to begin, then cut additional lengths as needed. Apply a small amount of glue to both front and back of one section of owl shape. Wrap section with A, going through center opening and around frame. Continue applying glue, wrapping with A, and cutting additional lengths of A until entire frame has been wrapped.
- For the wings, apply glue to both front and back of a section of one cardboard wing semi-circle. Wrap section with Thick & Quick Yarn: Raspberry (B). Continue applying glue and wrapping with B until entire semi-circle is covered. Repeat with second semi-circle.
- For the eyes, apply a small amount of glue to one side of a cardboard eye circle. Glue Thick & Quick Yarn: Fisherman in a spiral over one side of the circle.
- Glue one strand of A along edge of both long sides and one short side of cardboard frame backing. Remaining short side of frame backing is the top.
- Allow all pieces to dry.
- Lay wrapped owl shape face down. Apply a small amount of glue to yarn strand on cardboard frame backing.
- With the top (unglued) edge of the frame backing piece towards the top of the owl shape, lay the backing piece over the cut out opening on the back side of the owl and press firmly to adhere.
- Glue eye circles to front of owl, then glue a button onto each eye circle.
- Glue a short length of Thick & Quick Yarn: Apricot, folded into a loop, between eyes.
- Glue wings to owl.
- Lap one end of cardboard easel strip slightly over other end (so strip forms a loop) and glue.
- Apply glue to about 4 in. (10 cm) of strip. Center strip onto frame backing piece, with beginning of glued section at bottom of backing piece, and press firmly to adhere.
- Allow frame to dry, then insert photo through unglued top edge of backing piece.
Read NextPasta Sunflower Craft