This project was submitted by one of our readers, just like you.
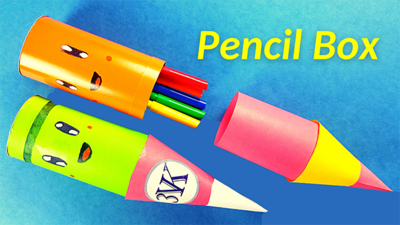
How To Make A Pencil Case Out Of Paper?

How To Make A Pencil Case Out Of Paper
" What is the age of the school pencil case? It is difficult to answer this question. If you consider any box for storing writing utensils as a pencil case, it turns out that the pencil case is as old as writing. A pencil case is a case for office supplies. It helps to keep pens, pencils, rulers neatly. These little things will not break or get lost in the portfolio, and the student can quickly prepare for the lesson. Making a pencil case from paper takes 25 minutes. Please don't forget to subscribe to our YouTube channel 3 VK YT."
Primary TechniquePaper Crafts

Materials List
- sheet of colored paper
- glue
- felt-tip pens
- scissors
Instructions
-
Take a sheet of paper measuring 21 by 12 cm.
-
We take, bend and twist a sheet of paper.
-
We glue both ends of the rolled sheet of paper.
-
We get a round glued paper blank (pencil case body), as shown in the photo.
-
We take a strip of paper 30 cm long and 2 cm wide.
-
We begin to make the lid of the pencil case. We take a strip of paper and wrap it around the edge of the blank, as shown in the photo. Cut off excess paper.
-
We glue the opposite ends of the paper strip. We get the ring.
-
We take a square blank of paper measuring 10 cm by 10 cm.
-
And we glue a paper ring to this blank.
-
Cut off excess paper as shown in the photo. The back wall of the pencil case is ready.
-
We begin to make the lid of the pencil case. We take a rectangular blank of paper measuring 20 cm by 7 cm. We bend and twist a sheet of paper, as shown in the photo.
-
We glue both ends of the rolled sheet of paper.
-
We get a round glued paper blank (inner base of the lid of the pencil case), as shown in the photo.
-
We take a rectangular sheet of colored paper measuring 20 cm by 7 cm.
-
We bend and twist a sheet of paper, as shown in the photo.
-
We glue both ends of the rolled sheet of paper.
-
Cutting off excess paper. We get the outer part of the pencil case lid, as shown in the photo.
-
We glue the outer part of the lid of the pencil case to the inner base.
-
Cutting off excess paper.
-
We make the tip of the pencil case cover. We take a rectangular sheet of colored paper measuring 12 cm by 7 cm. Repeat steps 14 - 17.
-
We begin to decorate the pencil case. We draw a face - eyes, mouth, cheeks. Pencil case - the pencil is ready !!!
NotesPlease don't forget to subscribe to our YouTube channel 3 VK YT.